
With your off-grid solar lights, you have been enjoying the benefits. You want to know how to fix a broken wire on solar lights because they stopped working. Fortunately, repairing broken wires isn’t as difficult as you might think.
How do you fix a broken wire on the solar lights? We’ve created a simple five-step guide to help you identify and fix the wiring problem. Here’s an overview:
- Prepare your solar light wiring for repair. Remove the batteries from the solar light. Make sure you have the right tools, such as a soldering iron and electrical tape.
- Check the entire solar light wiring for damage. However, to view the wiring inside the solar light housing, you may need to take the housing apart.
- It would be best if you fixed your faulty wiring. Additionally, wires could be repaired by removing defective wires or soldering them back together. Debris may need to be removed. However, cover exposed wiring with electrical tape.
- Test the solar lights to ensure they work properly after replacing the batteries.
- Remove the extra wiring and debris. If possible, recycle the material.
I hope this helps you get your solar lights back up and running again. Moreover, we have listed details for each step to help you fix this solar light wiring problem for more information.
Table of Contents
Step 1 – Preparing How to Fix Broken Wire On Your Solar Lights
You will need the following tools to inspect the wiring:
- Using a multimeter, you can tell if a wire is electrified or not. It measures the voltage, current, and resistance of a hot wire. However, the only thing you need to check is if there is a current. Indeed, you will not be shocked when you work on the wire if you follow these steps.
- Moreover, you may need a Phillips head or flat head screwdriver to remove the solar light or battery housing unit.
You may need the following tools to fix the solar lights wiring issue:
- Stripper and crimper for stripping and crimping wires
- Soldering iron – tool for joining small gauge wires
- Lead-free solder is used to bind the wires together. Lead solder melts at lower temperatures, but it must be handled carefully.
- Soldering paste – this creates a waterproof soldering area
- Solder paste flux – helps the solder flow smoothly onto the wire sponge – used to wipe off soldering iron
- A sponge is used to clean off the soldering iron when wet
- Safety glasses – protect your eyes from wire and solder splashes
- Heat shrink tubing – to cover the wiring after it has been repaired
- Heat gun – used to shrink heat shrink tubing
Step 2 – Determining The Type of Wiring Issues in Solar Lights
As every solar light is different, we are going to break down the types of wiring issues into five high-level categories. Prioritize your inspection based on the most likely issue first.
- Broken Connections – It doesn’t mean there’s a problem with the wire. Instead, it could be a broken or unscrewed light bulb. Also, it could be a parallel wire that is not connected to the terminal. How does this look? Some lights are out, but the rest are on. Perhaps half of a string of lights is on, and the other half is off.
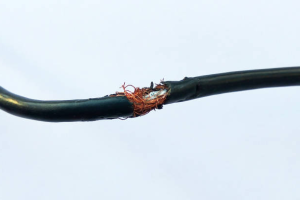
- Animal Interference – There is a possibility that wildlife, such as deer or squirrels, have chewed on your wiring. Visually inspect the wiring from one end to the other. Make sure the wires are not frayed or torn.
- Older Solar Lights – Depending on how old your solar lights are, there may be dirt or debris short-circuiting the control board. Another possibility is that the wiring leading to the lights has a bad connection at the circuit board terminal. You’ll need to open the solar light housing to inspect for this problem.
- Too Much Tension – Your solar lights might be wrapped around a post or a tree. These objects could move a little bit over time. Excess tension in the wiring could cause it to break. You would need a multimeter to inspect this.
How to Inspect Solar Lighting Issues With Tools
You have already inspected the wiring visually. No frays, tears, or loose connections are present. Using a multimeter is the last option for inspecting the wiring. You will be able to determine where you’re getting power and where you’re not.

Ensure the batteries are fully charged, and the lights are on. Take care with the wiring. Be careful not to shock yourself. Investigate the wiring issues for your solar lights by using the multimeter and following these steps:
- The red and black probes should be plugged into their respective ports on the front of the multimeter. The red probe should be plugged into the VΩmA port. The black probe should be connected to the COM port.
- Select VΩmA to measure milliamps. If it detects any current, this is the most sensitive setting.
- Put the red probe on one finger and the black probe on the other. Your body generates a small current naturally. The number should jump for a second in the multimeter and then settle on something close to zero. It was a test to make sure the multimeter was working properly.
- Change the VΩmA to measure resistance (Ω). Please put it on a resistance setting higher than the resistance of your solar light. You can find out the resistance level of your solar lights by doing a quick Google search. Now you are ready to diagnose the problem.
- The probes should be placed on the two circuit ends of your solar light. OL stands for open loop. There is no continuity if you get a reading like this or a 1. If the reading is zero or close to zero, the wiring is continuous.
Step 3 – How To Fix A Broken Wire On Solar Lights
You are now ready to learn how to fix a broken wire on solar light. It is likely to be one of the following three possibilities:
- A problem with a terminal on the circuit board
- A broken wire that needs to be repaired
- Faulty wiring that needs to be replaced
Fix The Solar Light Wiring At The Circuit Board
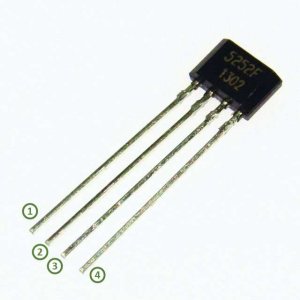
If there is a problem on the circuit board, you should be able to inspect the connection visually. Solar lights typically have a black chip with four pins. If the chip has “5252” on it, then follow this tutorial to understand how to fix each pin.
In the image below, pin 1, shown as a number, corresponds to the solar panel. The second pin corresponds to the battery. The ground is the third pin. As indicated by the number 4 in the image, the last pin is for the LED light. It would be best if you had an inductor between the second and fourth pins, which looks like a resistor.
If your chip does not say 5252, inspect it to see if the pins are labelled. S+ means solar positive. LED+ means positive LED signal. Battery positive is denoted by the B+ label. That leaves only the ground pin. After you’ve identified the correct pin and its wiring, you’re ready to proceed.
How To Fix A Broken Wire On Solar Lights: Fixing the Solar Panel Pin
Set the multimeter to DC voltage and then pull out the multimeter. Connect the black probe to the ground pin. The red probe should be placed on the solar pin and labelled as the first pin in the 5252 chip. This will give you the voltage coming from the solar panel.
If you read between 0.5 and 2 volts while the solar panel is in direct sunlight, then the wiring connection is functioning properly. If the voltage is near zero, there is a problem with a wire or connection.
Connect the red wire from the chip to the solar panel. The wire must be soldered back in place if it is loose at either connection. Later in this article, we explain how to solder broken wires. If the wiring is damaged, it must be replaced.
How To Fix A Broken Wire On Solar Lights: Fixing the Switch
You should check the switch to see if the solar panel is generating electricity. Weather-related corrosion or debris may be preventing it from turning on and off. Check the ground pin and battery pin with the multimeter. Turn on the switch. You could have a problem with the switch if you are reading a voltage near zero.
You may be able to clean out the switch or reconnect a loose connection. If none of those options works, you may have to replace the switch. On eBay, you can find a switch of a similar rating. Be sure the switch has the same current and voltage requirements. This article may not be about wiring, but it still explains how to fix a broken wire on solar light.
How To Fix A Broken Wire On Solar Lights: Fixing the Battery Pin
Now the switch seems to be working. To check the battery pin, use the multimeter. Connect the black probe to the ground pin. In the 5252 microchips, the second pin is labelled the battery pin. Place the red probe on the battery pin. You will see the voltage coming from the battery to the LEDs.
The wiring connection is working correctly when the switch is turned on, and you read between 0.5 and 2 volts. If the voltage is near zero, then there is a broken wire or a bad connection. Removing the battery from the battery housing will allow you to inspect the connections visually. Ensure there isn’t a broken piece of the battery connector.
Assuming the battery has been tested and works as expected, let’s move on to the LED light pin.
How To Fix A Broken Wire On Solar Lights: Fixing the LED Light Pin
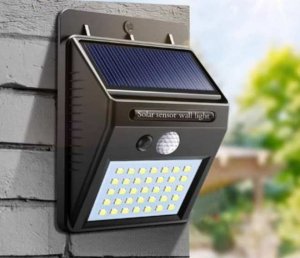
First, make sure the lights are working. Make sure the switch on a solar light is in the on position. Additionally, if your solar lights come on automatically at night, look for a photocell sensor. The picture below shows what a typical light sensor on a solar light looks like.
To engage the solar lights, cover the light sensor with non-clear tape. Indeed, your photocell sensor is likely to malfunction if the lights come on. We can use the multimeter to check the voltage of the pin leading to the LED lights if they are still not working.
Consistent and specific voltages must power LED lights in order to function properly. However, connect the black probe to the ground pin. Place the red probe on the LED light pin and the fourth pin on the 5252 chip. Moreover, this will give you the voltage going to the LED lights.
If the voltage is near zero, then you have a wiring problem. However, if the voltage fluctuates, then you have a battery issue. However, if your voltage is consistent, then the problem must be in the wiring downstream near some of your LED lights. In addition, see the next step to learn how to solder and fray solar light wires.
Soldering Frayed Solar Light Wires
Once you’ve identified the problem, the next step is to fix it. That’s where the soldering iron comes in. Use the steps below to solder two broken wires back together properly.
- Turn the switch off and remove the battery.
- Strip the wire so that roughly 3/4 inch of wiring is exposed on both sides.
- Please take out the heat shrink wrap and slide it over one of the wires. Keep it far enough away from the exposed wire to not get in the way of the soldering.
- Rub Rosin Paste Flex on the twisted wiring after twisting the two exposed wires together.
- Warm up the soldering iron. Place some lead-free solder on the tip and place it on the twisted wiring.
- Wipe the soldering iron with a damp cloth.
- Repeat steps 5-6 until the exposed twisted wiring is completely covered with solder.
- Apply silicone paste once the soldered area has been fully covered in solder.
- Apply heat shrink wrap over the soldered area.
- Heat the heat shrink wrap until it tightly binds to both wires when using the heat gun.
Here’s a short video that walks you through the soldering process.
Removing Faulty Light String
When you notice that a whole string of lights is out, but the others are still working, you might have a faulty light string. This is common with fairy lights and LED Christmas lights. In this case, you have two options:
- Replace the damaged light
- Remove the broken light and wire around it
To repair the problem, replace the broken light. It should be the first one out in the string of lights. However, if that doesn’t work, you may have to go around it.
Turn off the lights and remove the batteries first. After that, cut the wiring just before the LED light that doesn’t light. The LED light should be disconnected from the circuit. Moreover, the image below shows how this will eventually allow more room for rewiring.
Solder the two wires together using the steps described above. In addition, once the faulty wire has been removed, the rest of the lights should work again.
Step 4: Test The Solar Light To Make Sure It Works
Now that you’ve learned how to fix a broken wire on solar lights, it’s time to test the solar lights.
Make sure the batteries are fully charged and plugged in. Moreover, if the wiring issue were with the solar panels, the solar light would need to be placed in direct sunlight for three hours. However, that will allow the batteries to charge before testing the circuit fully.
At this point, the batteries should be plugged in. Turn on the switch and check that all the lights are on. If they are, you’ve fixed the wiring problem. If not, repeat steps 2 and 3 until you identify and resolve the wiring problem.
Step 5: Clean Up Your Wiring And Recycle!
You’ve completed the task, but your work isn’t done yet. When you leave, make sure the area is cleaned up. Moreover, recycle any excess wiring in your recycling bin. In the process, make sure you recycle your old batteries if you have to replace any. Solder splatter from the soldering earlier may need to be cleaned up. Indeed, a clean environment is a safe environment.
Read Next:
- Microwave Keeps Tripping Breaker When Door Opens – Here are Solutions!
- Why Does My Ecobee Say “Calibrating?” – Possible Causes And Troubleshooting
- DNS_PROBE_FINISHED_BAD_CONFIG – Fix In Chrome Easily 2022
- How to Connect Phone to Vizio Smart TV – Detailed Guide 2022
- Hisense TV Reset To The Factory Settings – Updated Guide 2022